Installing and Verifying the Nytro SEO JS Snippet on WordPress
1. How to Add the Snippet
Locating the JS Snippet
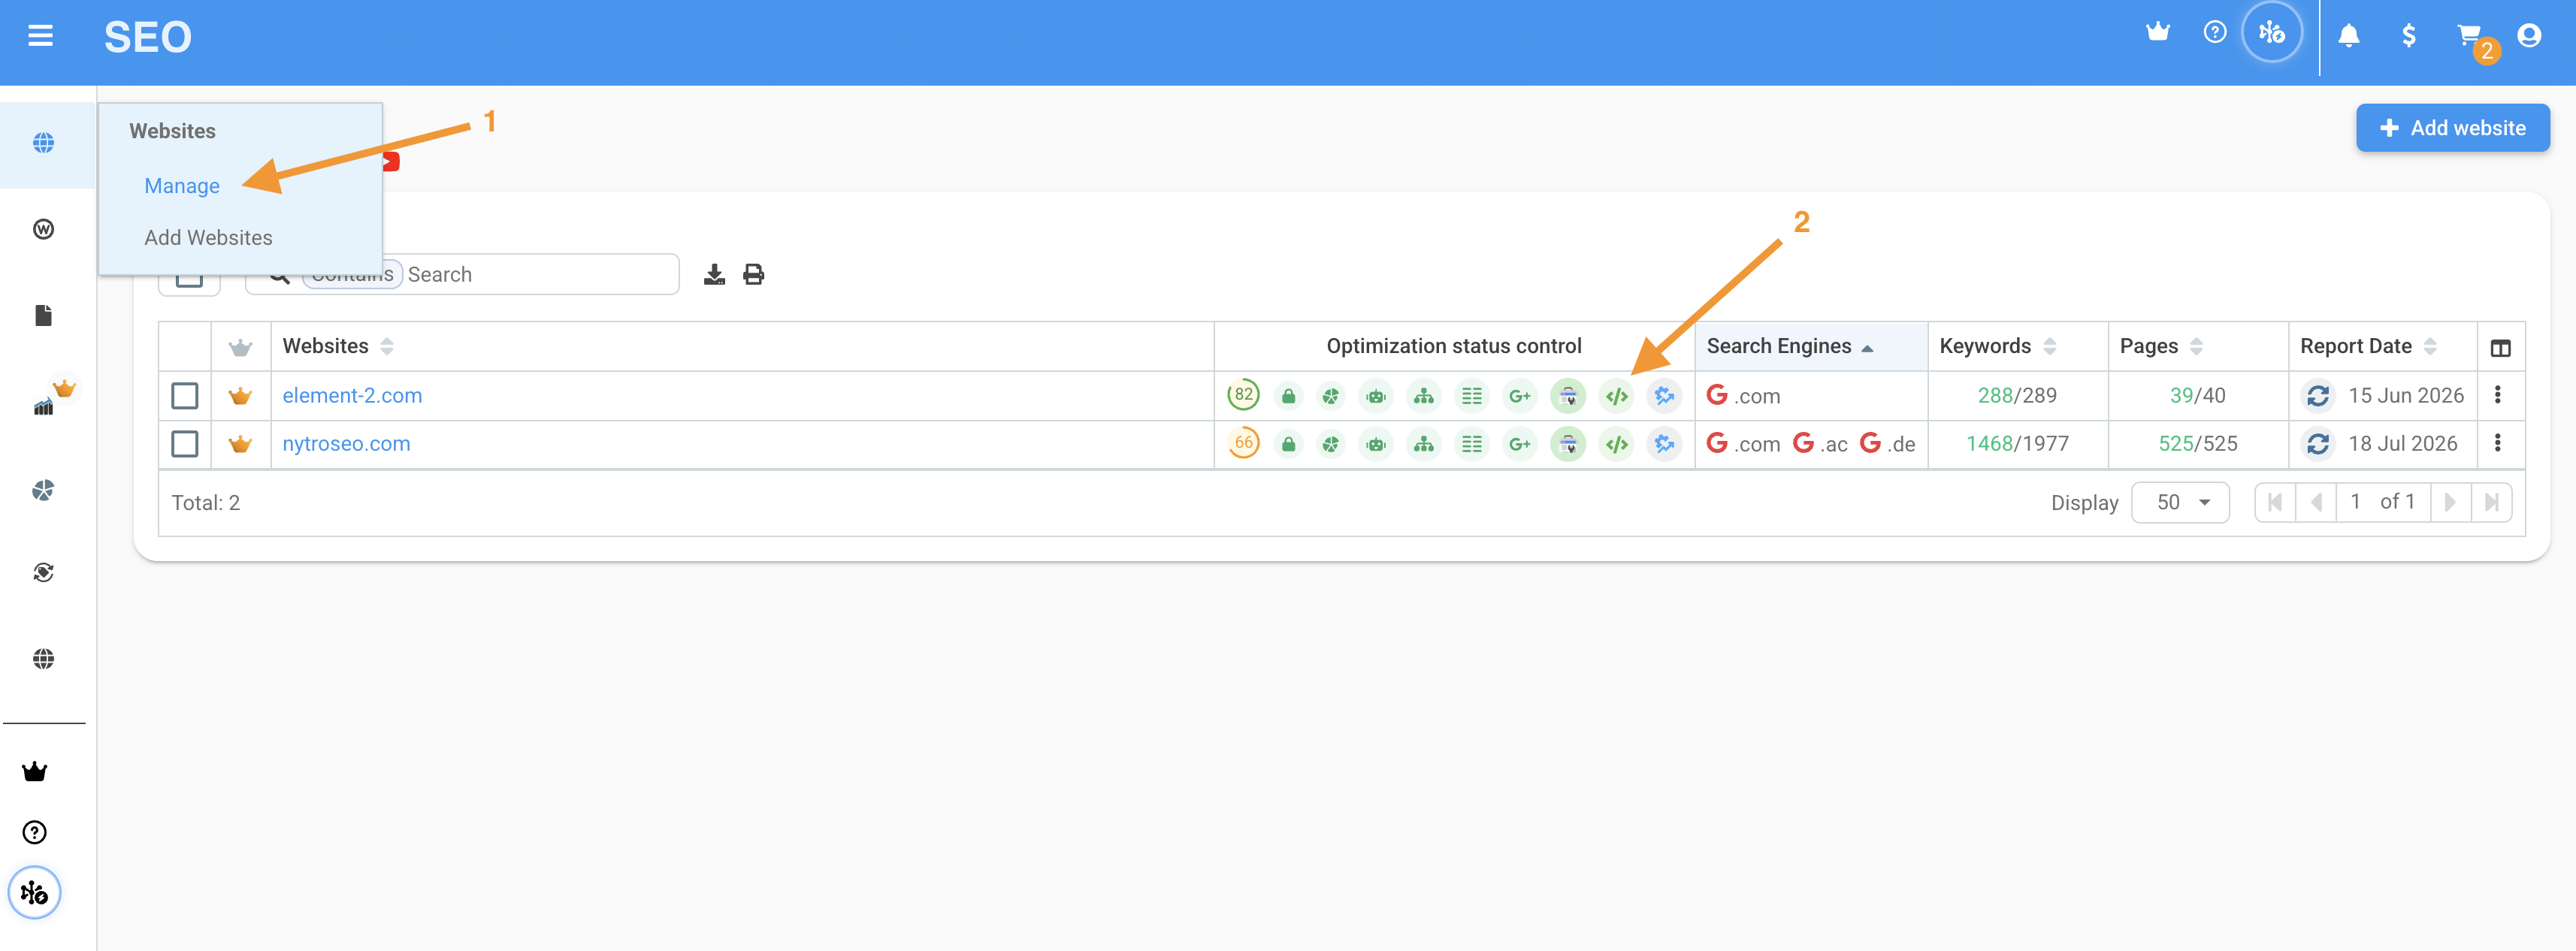
- Go to the Nytro SEO dashboard.
- From the left sidebar, select “Websites” ➡️ “Manage.”
- Click the symbol ‘</>’ to view the JS snippet for your website.
- Copy the snippet code.
 Note: If you haven’t added your website yet, check our guide here.
Accessing the WordPress Dashboard

Navigate to your WordPress admin panel.
Log in with your credentials.
2. Options to Place the Snippet
Using the PHP Header

From the WordPress dashboard, navigate to Appearance ➡️ Theme Editor.
Open the header.php file.
Paste the JS snippet before the closing </head> tag.
Save the changes.
Note: The snippet must be placed in the header or before the header. If you are using one of the classic WordPress themes, the option to access the theme editor will not be available and it will require you to install a snippet plugin.
Using Snippets Plugins
Header Plugin
1. From your dashboard, go to Plugins ➡️ Add New.
2. Search for "Insert Headers."
3. Install and activate the "Insert Headers" plugin.
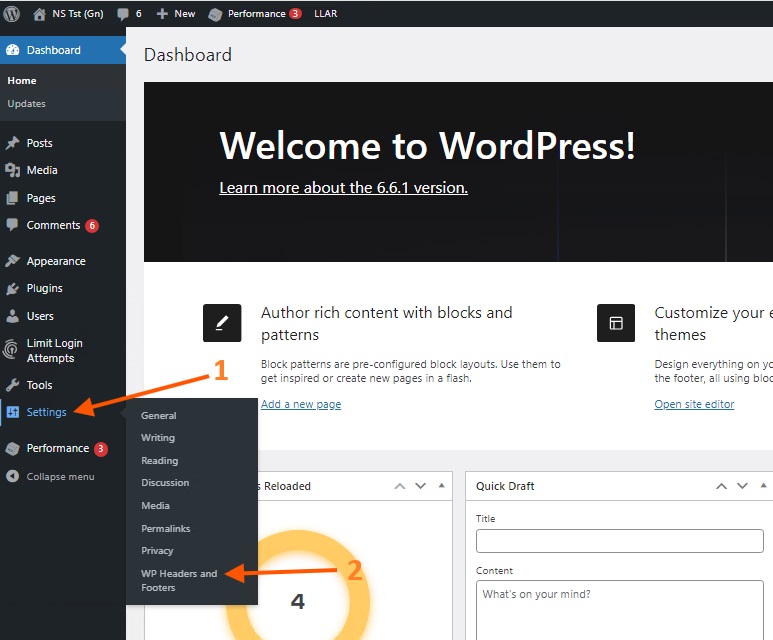
4. Navigate back to your WordPress dashboard and go to Settings ➡️ WP Headers and Footers ➡️ Scripts.
5. Paste the JS snippet in the "Scripts in Header" section.
6. Save the changes.
Other Plugins
WPCode
Install and activate the "WPCode" plugin.
From your dashboard, go to Code Snippets ➡️ Header & Footer.
Paste the JS snippet in the "Header" section.
Save the changes.
Clear/purge the cache.
Header Footer Code Manager
Install and activate the "Header Footer Code Manager" plugin.
From your dashboard, go to HFCM ➡️ Click the “Add New” button.
Insert the snippet name, set the type to JavaScript, and location to the Header.
Paste the JS snippet in the "Snippet / Code" section.
Save the changes.
Clear/purge the cache.
Elementor
1. From the dashboard, go to Elementor ➡️ Custom Code
2. Name for the code and ensure the location is set to <head>.
3. Paste the JS snippet in the code box.
4. Set the conditions to Entire site.
5. Save the changes.
6. Clear/purge the cache.
3. How to Verify the Snippet Installation
Nytro SEO Dashboard Verification
1. Go to the Nytro SEO dashboard.
2. From the left sidebar, select “Websites” ➡️ “Manage.”
3. Click the number next to your website to view the settings.
4. Under Website Optimisation, click the “OPEN” button next to “Snippet is not installed.”
6. A notification will be displayed about the status of the verification.
Using Browser Developer Tools
1. Open your website in a browser.
2. Right-click on the page and select "Inspect" or press F12.
3. Go to the "Elements" tab.
4. Click the arrow down next to the <head>.
5. Check the JS snippet by using the search shortcut (Ctrl + F).
Using Online Verification Tools
Utilize online tools like GTmetrix or Google Tag Assistant to verify the presence of the JS snippet, or use Chrome extensions.
4. How to Prevent Speed Plugins from Handling the Snippet (Exclude JS)
WP Rocket
1. From your WordPress dashboard, navigate to Settings ➡️ WP Rocket.
2. Go to the "File Optimization" tab.
3. Under "JavaScript Files," find "Excluded JavaScript Files."
4. Add plugin.nytsys.com to the exclusion list.
5. Save the changes.
W3 Total Cache
From your WordPress dashboard, navigate to Performance ➡️ Minify.
Go to the "Advanced" section.
Under "Never minify the following JS files," add plugin.nytsys.com
Save the changes.
Clear/purge the cache.
Autoptimize
From your WordPress dashboard, navigate to Settings ➡️ Autoptimize.
Go to the "JS, CSS & HTML" tab.
Under "Exclude scripts from Autoptimize," add plugin.nytsys.com
Save the changes.
Clear/purge the cache.
LiteSpeed Cache
From your WordPress dashboard, navigate to LiteSpeed Cache ➡️ Cache.
Go to the “[4] Excludes” tab.
Under “Do Not Cache URIs,” add plugin.nytsys.com
Save the changes.
Clear/purge the cache.
WP Super Cache
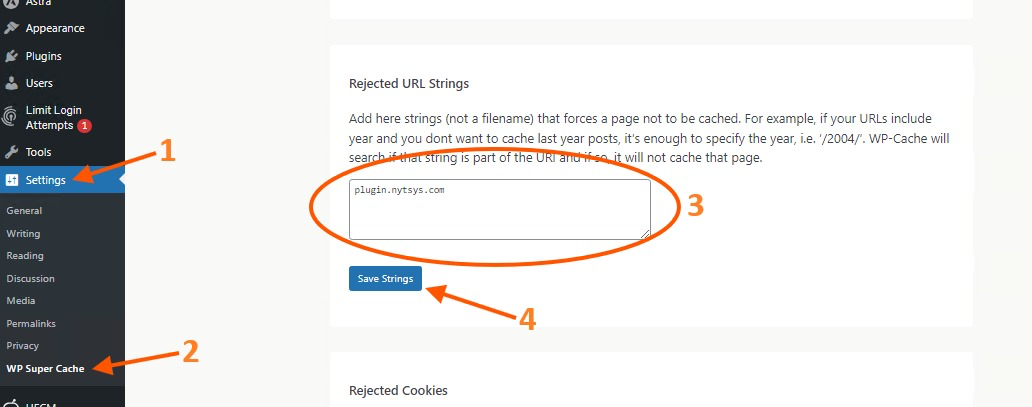
Navigate to Settings ➡️ WP Super Cache.
Go to the Advanced tab.
Under “Rejected URL Strings,” add plugin.nytsys.com.
Save the changes.
Clear/purge the cache.
WP Fastest Cache
Navigate to WP Fastest Cache.
Click the “Exclude” tab.
Click the “Add New Rule” button next to the “Exclude JS” section.
Add plugin.nytsys.com to the pop-up window.
Save the changes.
Clear/purge the cache.
WP-Optimize - Clean, Compress, Cache
Navigate to WP Optimize ➡️ Cache.
Go to the Advanced tab.
Under “URLs to exclude from caching,” add plugin.nytsys.com.
Save the changes.
Clear/purge the cache.
5. Troubleshooting
The snippet is not verified.
Page loading issues.

Clear/purge the cache and try again.
W3 Total Cache
Ensure the snippet is correctly placed in the header.
Disable conflicting plugins temporarily to check for conflicts.
Additional Resources
Submit a Ticket
Related Articles
Installing and Verifying the Nytro SEO JS Snippet on BigCommerce
1: Locating the JS Snippet Go to the Nytro SEO dashboard. From the left sidebar, select “Websites” ➡️ “Manage.” Click the symbol ‘</>’ to view the JS snippet for your website. Copy the snippet code. Note: If you haven’t added your website yet, check ...Installing and Verifying the Nytro SEO JS Snippet on Wix
1. How to Add the Snippet Locating the JS Snippet Go to the Nytro SEO dashboard. From the left sidebar, select “Websites” ➡️ “Manage.” Click the symbol ‘</>’ to view the JS snippet for your website. Copy the snippet code. Note: If you haven’t added ...Installing and Verifying the Nytro SEO JS Snippet on GoHighLevel
1: Locating the JS Snippet Go to the Nytro SEO dashboard. From the left sidebar, select “Websites” ➡️ “Manage.” Click the symbol ‘</>’ to view the JS snippet for your website. Copy the snippet code. Note: If you haven’t added your website yet, check ...Installing and Verifying the Nytro SEO JS Snippet on Squarespace
1. How to Add the Snippet Locating the JS Snippet Go to the Nytro SEO dashboard. From the left sidebar, select “Websites” ➡️ “Manage.” Click the symbol ‘</>’ to view the JS snippet for your website. Copy the snippet code. Note: If you haven’t added ...Installing and Verifying the Nytro SEO JS Snippet on Duda
1: Locating the JS Snippet Go to the Nytro SEO dashboard. From the left sidebar, select “Websites” ➡️ “Manage.” Click the symbol ‘</>’ to view the JS snippet for your website. Copy the snippet code. Note: If you haven’t added your website yet, check ...